This guide will show you how to install an MQTT broker, namely Mosquitto, on your Unraid server. MQTT (Message Queuing Telemetry Transport) is the perfect network protocol for connecting remote devices, such as those used on the Internet of Things (IoT). It has a small code footprint and uses minimal network bandwidth. No wonder then, that applications such as Zigbee2MQTT rely on MQTT for communication. MQTT is an open OASIS and ISO standard (ISO/IEC 20922), making it relatively future-proof.
Mosquitto is possibly the most popular message broker that implements the MQTT protocol versions 5.0, 3.1.1 and 3.1. An MQTT broker, such as Mosquitto, acts as a post office. When sending a message, MQTT doesn’t use the address for the intended recipient. For example, you don’t need to enter any IP when trying to get Zigbee2MQTT to communicate with the home automation software Home Assistant. Instead, MQTT uses topics.
Anyone who wants to receive a copy of a certain message has to subscribe to that topic. To take our previous example: When you want Home Assistant to receive messages from Zigbee2MQTT you would have it subscribed to all topics beginning with zigbee2mqtt. That way, multiple clients can receive a message from a single broker, which is also described as the one to many capability.
Installing the Mosquitto MQTT broker on Unraid
As with most popular applications, the Mosquitto MQTT broker can be found in the Community Applications. Simply search for the title and a template provided by cmccambridge should show up. Click on the installation icon and continue with the app’s configuration.
There are only a few settings to adjust, so I will go through them one by one. The configuration directory should be placed in your appdata folder, along with all other persistent Docker directories. You might also want to add folders for persistent data and logs, though these are not required.
It’s best to leave the host’s port set to 1883, as this is MQTT’s standard port. Any clients you connect to the Mosquitto MQTT broker, will be looking for it on port 1883 by default. Finally, you can select whether you want to password-protect your MQTT broker or not. I highly suggest using a password as it doesn’t make the setup much more complicated, but you broker’s security will benefit from it.
Enabling password-based authentication
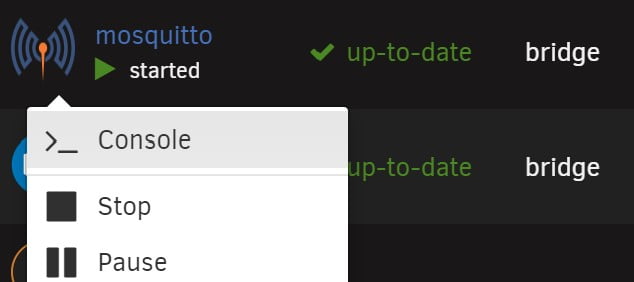
To create a user and password, you will have to execute a few commands within the Docker container. To do so, head over to your Docker overview in the Unraid dashboard and search for Mosquitto. Once found, click on its icon and select the option Console.

First you will need to create a file to store the passwords as it most likely doesn’t exist yet. To do so, you can use the touch command:
touch /mosquitto/config/passwdWith the file created you can create your first user. Most likely you will never need more than a single user, but if you ever were to need more than one, you can simply execute the same command one more time. After hitting Enter you will be prompted to set a password:
mosquitto_passwd /mosquitto/config/passwd <MQTT_USER_NAME>Just like that you have created your user. For the settings to be applied you will need to restart the Docker container. You can now start connecting other services to your Mosquitto MQTT broker running on Unraid.


