
There are numerous reasons why you might want to route a certain Docker container’s traffic through a virtual private network (VPN). This article will guide you through the process of setting up a single Docker container on Unraid that connects to your VPN, and the routing of other containers through it. I won’t go in to why I use a VPN and your reasons are of no interest to me. There are applications, many of which will be installed on an Unraid media server, where it makes sense to do things this way, and I’m confident you know which ones those are.
Currently, there are numerous VPN services out there, and I am a customer of both Windscribe and Private Internet Access (PIA). My top recommendation for a VPN is Windscribe, but at the end of the day it is your decision on whom’s service you want to use. I have nothing bad to say about PIA either, and I know many Unraid users use their service. I will not be describing the pros and cons of individual services in this article, the only requirement is that your VPN allows you to download a .ovpn file. There are no VPN’s that will work better or worse with Unraid.
Why not use applications with a VPN service baked in?
You will find a bunch of applications available as Docker containers on Unraid, which include an OpenVPN client baked in, making the setup much easier. Examples of these are activ/arch-transmissionvpn, binhex/arch-delugevpn, and binhex/arch-sabnzbdvpn. These allow for a straightforward setup, as you don’t have to adjust any advanced settings and generally only have to select your VPN provider and enter your credentials.

While there is nothing inherently bad about these Docker containers, they do have one major drawback: You use up one of your VPN slots for every application you configure. For example, Private Internet Access, which is one of the VPN providers I use, allows up to 10 simultaneous connections. If I were to set up each container individually, I would soon max out my account.
In my opinion, the better alternative is to use a single OpenVPN Docker container on Unraid and route any number of applications through it. This way you will only use a single slot for all traffic because there is only one application directly connecting to the VPN. With Windscribe and PIA, I know there is no rule forbidding me from using this setup, and I haven’t heard of any other VPN providers forbidding it either.
Installing and setting up an OpenVPN client
To start things off, you are going to want to install the community application OpenVPN-Client (dperson/openvpn-client). This container will be responsible for connecting to the VPN, through which other containers can route their traffic. There are a number of comparable Docker containers available in Unraid’s Community Applications, but I can guarantee that the one mentioned above works.
Once installed, start the container from your Unraid dashboard and stop it after a few minutes if it hasn’t already done so itself, as it can’t connect to anything yet. During its first start, the OpenVPN-Client application will create the necessary file to proceed. If you have left the template as it is, you will find it under /mnt/user/appdata/openvpn-client/.
Adding an OpenVPN file
For OpenVPN-Client client to be able to run, you will need to add a .ovpn file to the folder structure and enter your credentials. If you are using Private Internet Access you can download a zip file containing all configurations from your account. If you are using a provider other than PIA, a quick search for that provider’s name followed by “ovpn files” should bring forward what you are looking for.
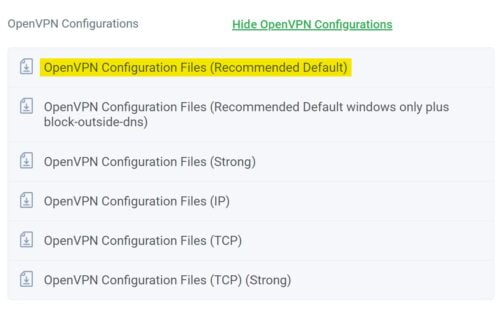
Once extracted, you will find numerous files in the downloaded folder, which will allow you to connect to different locations. I recommend you go for the closest location to where you are. That way you should be getting the best performance while still remaining anonymous. Rename the file to vpn.ovpn and copy it to the folder /mnt/user/appdata/openvpn-client/ OpenVPN-Client created.
Adding your VPN login credentials
In the same directory (/mnt/user/appdata/openvpn-client/) you will want to create a new file titled vpn.auth. Open the file and enter your VPN username on the first line and your password on the second. With the authentication file created and the OpenVPN file copied, your OpenVPN Docker container is ready and can be started.
Verifying that your VPN container is working
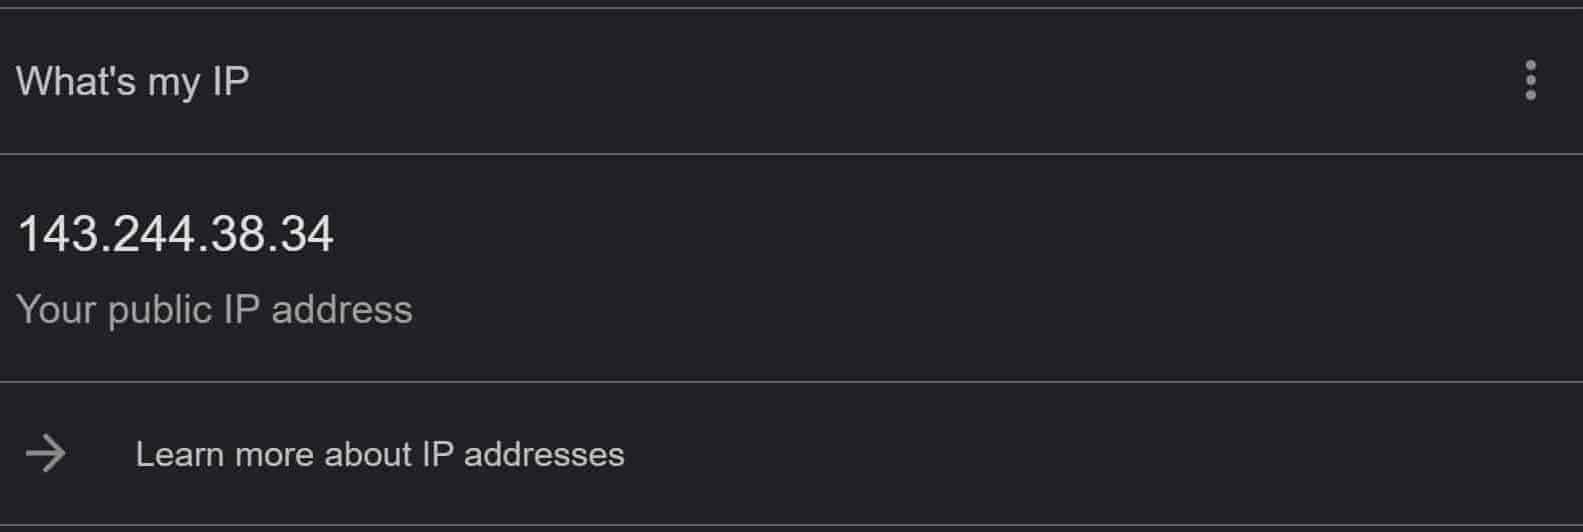
Once started, you can take a look at the logs to figure out whether a connection to the VPN could be established. Another way of confirming the Docker container’s functionality is by entering its console and executing the command curl ifconfig.io. Take note of the IP the command returns and then google for “What is my IP” on your desktop (without being connected to the VPN). If your container’s IP differs from your desktops, you are connected.
If everything has been confirmed to be working, you can stop the Docker container, as further modifications of the settings will take place in the next step.
Routing other applications through the OpenVPN container
On to the part you’ve been waiting for: How to route your existing (and any future) applications running on Unraid through your OpenVPN-Client container. For this, you will want to enter the to-be-routed application’s Docker container settings and toggle the advanced settings in the top-right corner. There are only two settings you will have to adjust.
- Set the network type to ‘none’.
- Add
--net=container:OpenVPN-Clientto the extra parameters.

Configuring the ports
One last step is required before you can finally start your VPN container. The ports of the Docker containers you want to be routed through it have to be mapped. Without this step, you would have no way of accessing the application’s web dashboard. Open the to-be-routed container’s settings and take note of the mapped ports.

Open the OpenVPN-Client settings and map every port you just took note of. For example, add port 7878 as both the host and container port if you wanted to route Radarr. You can now start the OpenVPN-Client Docker container, wait for it to connect, and then start the to-be-routed container. You can once again use the curl ifconfig.io command mentioned above to check whether the container is using the VPN or not.


Great guide.
One question though.
If you’re using a service you’d like to access, how do you access it if it doesn’t have an IP?
Thanks! You can still access it using the IP and Port set for the web GUI.